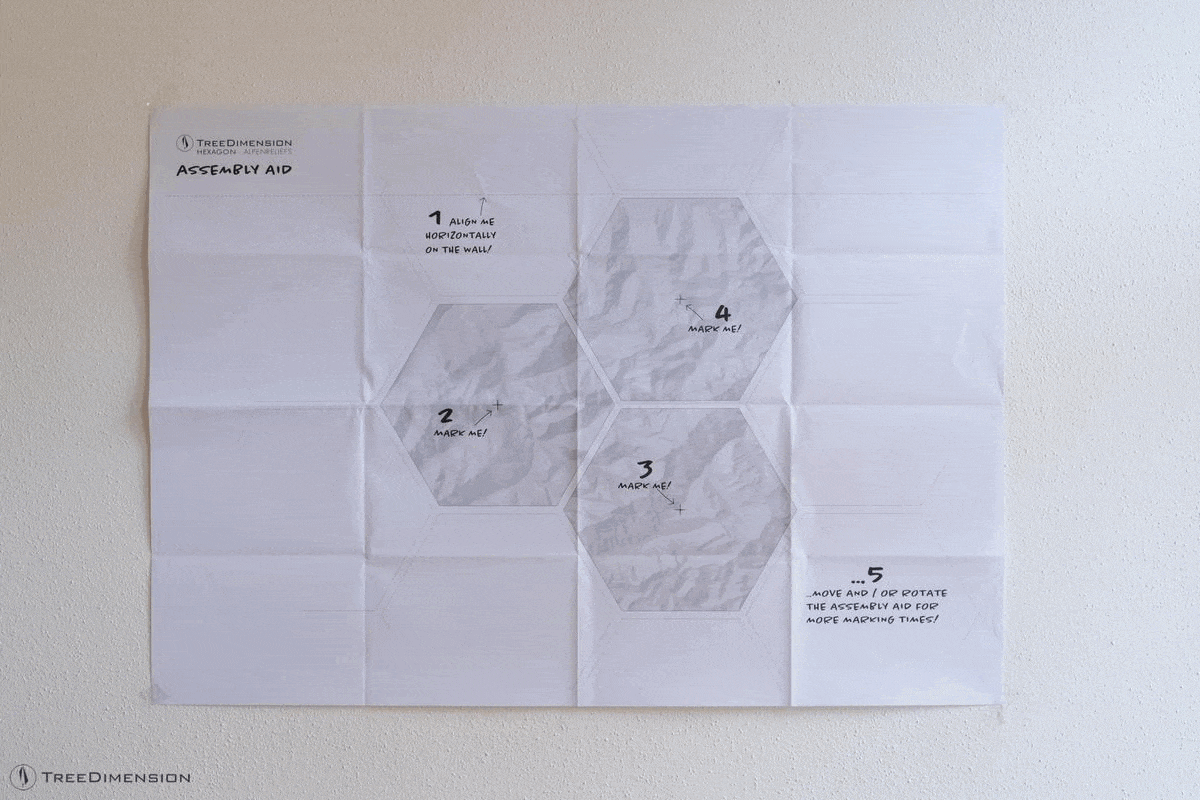
Assembly instructions - step by step

With these steps you can create your new Hexagons attach to the wall easily and without complicated measurements.

  • Accessories included:

    • 1× wall plug per hexagon
    • 1× screw per hexagon
    • 1× wooden hex washer per hexagon
    • 1× paper mounting template (included with orders of 2 or more hexagons)
  • Tools needed:

    • Adhesive tape (e.g., Scotch tape)
    • Pencil
    • Drill with 5 mm drill bit
    • Hammer, if necessary
  • Step 1: Preparation

    • Lay the hexagons out on the floor and arrange them the way you want them to be on the wall later.
  • Step 2: Assembling the template

    • Glue the paper mounting template to the wall as horizontally as possible. Use a spirit level to ensure the template is placed straight.
    • Note: Ensure that the template cannot shift during the next few steps by fixing it with tape in several places.
  • Step 3: Mark centers

    • Use a sharp pencil to pierce through the marked crosses on the template to transfer the centers of the hexagons onto the wall.
    • If you want to mount more than 3 hexagons, you can reuse the template by rotating, shifting, and re-taping it.
    • Remove the template and make sure all marked points are visible and correctly placed.
  • Step 4: Drill Holes

    • At the centers previously transferred to the wall, the holes for the dowels must now be drilled with a drill and a 5mm drill bit.
    • Note: Drill carefully, making sure the holes are perpendicular to the wall. The more precise you are with this step, the more uniform the joints will be.

    • Insert the dowels into the drilled holes.
  • Step 5: Attach the mounting hardware

    • Screw the hexagonal wooden washers into the wall plugs.
    • Tip: Tighten the screws well and ensure one corner of each hexagon is aligned horizontally (pointing left and right).
  • Step 6: Assemble Hexagons

    • Now the hexagons can be carefully placed on the washers.
    • Note: Make sure they are straight and seated securely on the washers.
  • opt. Step: Align Hexagons

    If there are gaps of different sizes between the individual hexagons, you can try the following afterwards:

    • Remove the affected hexagon(s).
    • Slightly loosen the screw and adjust the wooden washer.
    • Tighten the screw again.
    • Re-mount the hexagon(s).

With these steps you can create your new Hexagons attach to the wall easily and without complicated measurements.